Last year's series of posts on the zombie brain that I did in collaboration with Brad Voytek over at Oscillatory Thoughts was a huge hit. Since then we've managed to turn this thought experiment into a book deal with the amazingly supportive folks at Princeton University Press. Brad and I have also worked with the TED Education group to do a two-part series of education shorts on teaching neuroscience using zombies. You can watch both videos over at TED-Ed or just watch the first one here.
I have to say, the TED Ed group is absolutely amazing to work with. If you get a chance to do a project with them, I highly recommend it.
Okay, back to the main post. A key part of the talks that Brad and I give about the zombie brain is our 3D model of how it should look. This is a simulated brain brain to show where lesions who have likely occurred and how they relate to various zombie "symptoms."
Check it out. The zombie brain is the one on the right.
Now I often get asked how we actually made this model zombie brain. I mean we can't really get a zombie and image it right? Right???
Well until the zombie apocalypse gets us sufficient specimens to can, we had to do something else. We had to take a human brain and morph it into what the zombie brain should look like.
So this post is for all you imaging geeks out there who want to know how to make your own model of the zombie brain.
For this you'll need 7 things. All files can be downloaded from my website.
1. A template brain of a normal human: HERE
2. A segmented image of said human brain: HERE
3. A list of voxel IDs for the segmented map: HERE
4. A list of regions you wish to "lesion": HERE
5. A routine for extracting regions from the segmented map: HERE
6. A routine for merging region files: HERE
7. The core lesion loop script: HERETo follow exactly my steps, you'll need Matlab and SPM8. Although the logic is simple enough that if you're familiar with other imaging analysis programs/platforms you can replicate the process there.
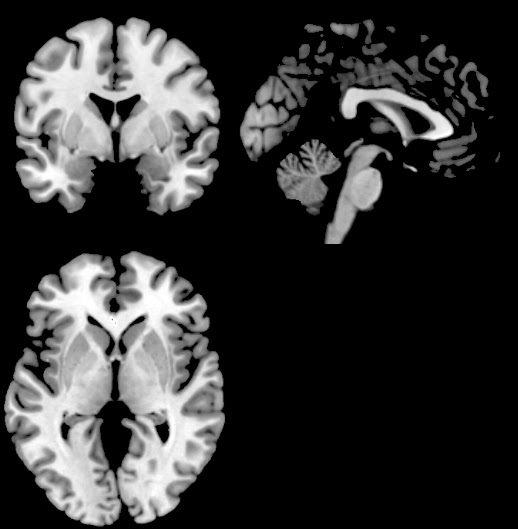
Step 1: Get a good template MRI image. I like using the Colin Brain, which is an average of several dozen structural brain scans of the same subject (Colin). The Colin Brain is a standard template image in most analysis software packages or you can download the original here. For this to work properly, you should use the skull stripped version (I used the ch2better.nii template that comes default with MRICron). So if it's not skull stripped already, you should use a skull stripping program to do it (I've had good luck with BET2 in the past). You can download the specific Colin Brain template that I used here.
This is what the Colin brain looks like normally. Consider this our human template.
Step 2: Get a template segmentation map. There are dozens of template segmentations these days. I used the Automated Anatomical Labelling (AAL) template from the aal.nii file that comes standard with MRICron, but this is a pretty ubiquitous template these days. Or if you don't want to go with a standard segmentation, you can use a program like Freesurfer to automatically segment the template brain you've chosen. The important thing is that the template you use has a list of labels for each region ID number so you can choose them from a list (e.g., the aal.lut.txt file). I've posted the AAL template and the region list I used on my website.
Here's a snapshot of the regions in the AAL template. Each color represents a different labeled brain area.

Step 3: Isolate the segmentation map. This is a painful step. You need to write a routine to extract each region from the segmented template. I wrote a quick Matlab program to do it and you can download the segmentation routine here (NOTE: no promises it will work for you, I'm not gonna support any of this code... just sharing). If you load the text file of the region list and voxel ID numbers, this will run through and make separate images for each region.
Step 4: Reslice the regions to the template space (NOTE: you can skip this step if you ran a segmentation routine on the template brain yourself). In my case the template (human) brain is a 3D matrix with xyz dimensions of 301x370x316. However, the AAL template file I used has the dimensions of 181x217x181. So we just need to reshape the matrix size of each region of interest we extracted from the AAL file to match the size of the template brain. I used spm_reslice.m for this.
Step 5: Get a list of regions you want to "lesion". Now from the full list of extracted regions, you'll want to choose which parts of the brain you want to wipe out. Here's the list I used for our zombie brain.
Step 6: The virtual lesion loop. The principles of this loop are pretty easy. For each region you want to loop through the list, load the file of that region, find the voxel coordinates of that region, save them in a map. Then you'll want to make two maps.
The first map, isolates the areas to be lesioned and removes the gray matter (i.e., voxels in these regions with an intensity less than some threshold will be set to zero). It will look like this.

The second map is a map of everything else to be spared. It looks like this.

Once you've got your two maps, you'll want to put them back together again. The resulting map looks like this.

It's not perfect but it's close. The final step of the process is to smooth out the rough edges. I used the spm_smooth.m function for this with a smoothing kernel of 3mm FWHM. The end result is what you saw above.

Voila. You've just turned Colin into Zombie Colin! Here's the overlay of the original Colin brain and the zombie brain (orange) cause it's so cool!

Now with this routine you can pick and choose which areas you want to lesion. This is how I came up with the fast versus slow zombie brains.

There's a lot of room to use this as you please for teaching and demonstrations. It makes for easy visualisation of lesion/atrophy for educational purposes. But remember, it's faked data, so ALWAYS use that disclaimer.
So that's it. You've made Colin into Zombie Colin and now you can show him off to all your friends.
Until next year, Happy Halloween everyone!
I shouldn't be surprised that TED got in on Zombie/Neuroscience education...great post.
ReplyDeleteBest Awning dealers in Pune
ReplyDeleteAwning dealers Pune
awning manufacturers pune
awning in pune, awning manufacturers in pune, awning dealers in pune
awning suppliers in pune
best awning suppliers in pune
Iris Enterprises Awning in Pune | Canopy in Pune